

Posting on Instagram is a simple way to share photos, videos, ideas, and updates with your audience. Whether you’re sharing a single photo, uploading multiple images in a carousel, creating a Reel, or posting a quick story, Instagram gives you several ways to connect with people and showcase your content.
If you’re wondering how to post on Instagram, the process is straightforward, but the steps can vary slightly depending on whether you’re using the Instagram mobile app or a computer. Knowing how each option works can help you choose the right format and publish your content with confidence.
In this guide, you’ll learn how to post on Instagram from start to finish, including how to upload photos, share multiple images, post videos, create Reels, and publish Stories. You’ll also learn how to write better captions, use hashtags and tags effectively, optimize your content before publishing, and troubleshoot common posting problems.
Ready to make Instagram posting easier?
Manage your content and campaigns with Practina.
Try PractinaWhat Can You Post on Instagram?
Instagram gives you several ways to publish content, including:
- Single-image posts: Share one photo in your Instagram feed. This format works well for product photos, announcements, personal moments, quotes, or other visual content.
- Multiple-image carousel posts: Combine multiple photos or videos into one post that users can swipe through. Carousels are useful for step-by-step guides, educational content, product showcases, and visual stories.
- Video posts: Share video content directly with your audience through your Instagram profile and feed.
- Instagram Reels: Create short-form, vertical videos designed for engagement and discovery. Reels can help you reach people beyond your existing followers.
- Instagram Stories: Share photos, videos, and updates that are designed for more temporary, casual, or timely interactions with your audience.
A traditional Instagram feed post generally refers to content published to your profile that remains available unless you archive or delete it. Stories, on the other hand, are designed to be temporary, while Reels focus primarily on short-form video content and discovery.
Which Instagram Post Type Should You Choose?
The best format depends on what you want your content to accomplish. Before you post, consider your goal and choose the format that supports it.
| Your Goal | Best Format |
| Share one important image. | Single photo |
| Tell a story or explain multiple points. | Carousel |
| Share short-form video content. | Reel |
| Share temporary updates or behind-the-scenes moments. | Story |
| Showcase video content in your feed. | Video |
For example, a restaurant might use a single photo to showcase a new dish, a carousel to highlight several menu items, a Reel to show how a dish is prepared, and a Story to promote a limited-time offer.
How to Post Photos or Videos on Instagram From Your Phone?
If you’re learning how to post on Instagram, your phone is usually the easiest place to start. The Instagram app lets you upload photos and videos directly from your camera roll, edit your content, and add details before sharing it with your audience.
Whether you want to share one photo, upload multiple images, or post a video, the basic process is similar. The main difference is what you choose to upload and how you prepare it before publishing.
1. Choose What You Want to Upload on Instagram
Open the Instagram app and tap the + (Create) button to start creating your post. From there, choose the type of content you want to share.
You can typically choose from options such as the following:
- A single photo: Best for sharing one important image, product, announcement, or personal update.
- Multiple photos or videos: Useful when you want to show several images in one post, create a step-by-step guide, or tell a visual story.
- A video: A good option for sharing demonstrations, educational content, or other video-based updates.
- A Reel: Ideal for short-form, vertical video content designed to capture attention and reach new audiences.
2. Check Your Photo or Video Before You Upload
Before you post Instagram photos or videos, make sure the content looks clear and fits the format you’re planning to use. Instagram may crop or adjust your content depending on how it is uploaded, so it’s worth checking the framing before you publish.
Instagram content works best when you use the right file type and dimensions for each format. Before uploading, keep these common specifications in mind:
- Photos: Use JPG, JPEG, or PNG files with a width of at least 1,080 pixels.
- Videos: MP4 and MOV are commonly supported, with a minimum width of 1,080 pixels.
- Feed posts: Instagram supports aspect ratios ranging from 1.91:1 to 3: 4.
- Reels: A vertical 9:16 format is recommended for a full-screen viewing experience.
- Reel covers: Keep in mind that cover images may be cropped differently across Instagram. A size of around 420 × 654 pixels (approximately 1:1.55) is recommended.
- Square and vertical content: Square (1:1) and vertical formats can work well in Instagram’s mobile feed because they take up more screen space.
3. Edit and Adjust Your Content
After selecting your media, Instagram gives you tools to make basic changes before you publish. You can crop your image, apply filters, and adjust elements such as brightness, contrast, and other visual settings. Depending on the type of content you’re creating, additional editing options may also be available.
You don’t need to make major changes to every photo or video. For beginners, the goal should simply be to make your content look clear, balanced, and easy to view.
For example, you may want to:
- Crop out unnecessary parts of a photo.
- Adjust brightness if the image is too dark.
- Improve contrast so the subject stands out.
- Use a filter that matches your visual style.
- Trim a video to remove unnecessary sections.
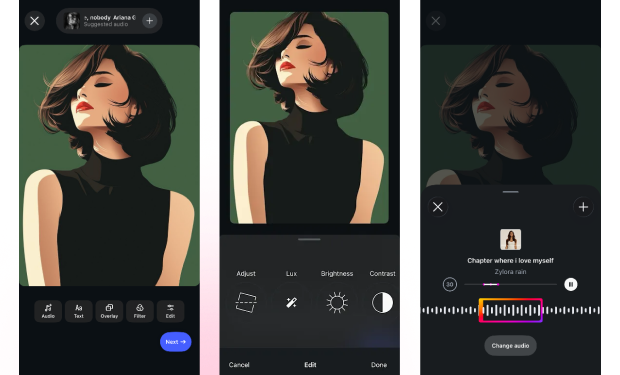
| Some aspect ratios you must know Landscape posts: 1.91:1 Square posts: 1:1 Portrait/vertical posts: 4:5 Reels: 9:16 for a full-screen vertical experience Stories: 9:16 is recommended. |
How do I post a story on Instagram from my phone?
Instagram Stories are a quick way to share photos, videos, and updates with your audience. Unlike regular feed posts, Stories are designed for more immediate and casual content and typically disappear after 24 hours unless you save them to your Highlights.
How to Upload a Story on Instagram
Steps to follow when uploading a story.
Step 1: Open the Story Camera.
Open the Instagram app and tap the + button, then select “Story”. You can also swipe right from your Instagram feed to open the Story camera.
Step 2: Capture or Choose Your Content
Tap the capture button to take a new photo. To record a video, press and hold the same button.
If you want to use content already saved on your phone, tap the gallery icon and choose the photo or video you want to share.
Step 3: Customize Your Story
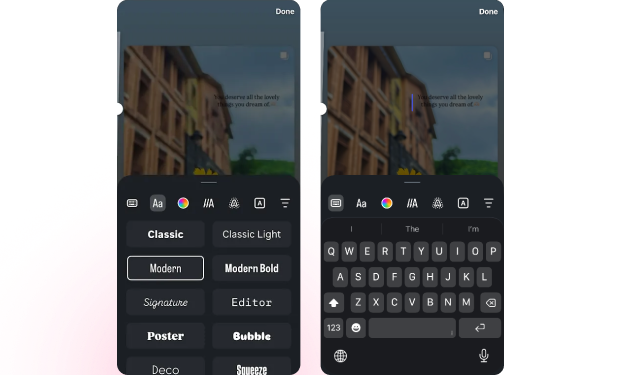
Use Instagram’s available editing tools to personalize your Story. You can add text, music, stickers, filters, drawings, and other effects to make your content more engaging.
Step 4: Share Your Story
When you’re happy with your story, tap Your Story to share it with your followers. If you want to limit who can see it, you can choose Close Friends instead.
Once you’ve selected your content, you can personalize your story before sharing it. Instagram provides several creative tools, including
- Text: Add a message or important information to your story.
- Stickers: Add visual elements or interactive features.
- GIFs: Make your story more fun and expressive.
- Music: Add a song or audio to match the mood of your content.
- Polls: Ask your audience to choose between different options.
- Questions: Give followers a way to respond and start a conversation.
- Mentions: Tag relevant people or accounts
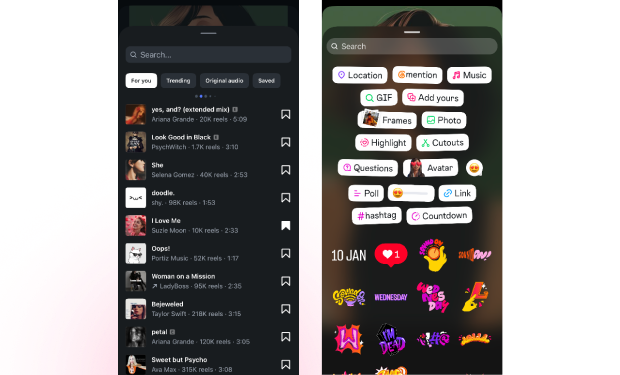
These features can make a story more interactive instead of simply asking people to view a photo or video. For example, a business launching a new product could share a preview and use a poll to ask followers which version they prefer.
| A few simple practices can make your stories easier to follow: ▪ Add captions to videos when spoken words are important. ▪ Keep text large enough to read on a phone screen. ▪ Use strong contrast between text and the background. ▪ Avoid placing important text too close to the edges of the screen. ▪ Add descriptive information where Instagram’s accessibility features allow it. ▪ Use vertical content that fits the story format properly. |
Before sharing, preview your story to make sure the text, stickers, and other elements are visible and don’t cover important parts of your photo or video.
Share Your Story or Save It to Highlights
Once your story is ready, review it one final time and tap the Share option to publish it.
Your story will generally remain available for 24 hours. If you want to keep useful or important stories visible on your profile for longer, you can add them to Highlights. Highlights appear on your Instagram profile and can help organize Stories into useful categories.
For example, a business might create Highlights for:
- Products or services
- FAQs
- Customer reviews
- Events
- Promotions
- Behind-the-scenes content
For personal accounts, Highlights can also be used to save travel memories, special events, hobbies, or other moments you want to keep available on your profile.
Stories are especially useful when you want to share something quickly and encourage direct interaction. By combining simple visuals with features such as polls, questions, and stickers, you can give your audience more ways to participate instead of simply scrolling past your content.
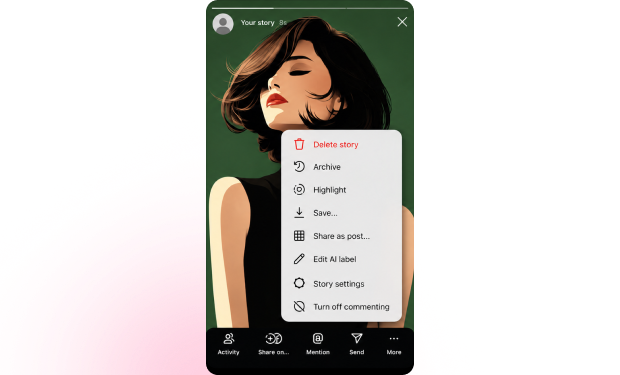
| What’s the difference between an Instagram post and a story? ▪ Instagram Post: Appears on your profile and stays there until you archive or delete it. Best for photos, videos, and carousels you want people to find later. ▪ Instagram Story: Usually disappears after 24 hours and is designed for quick, timely, and more casual updates, such as behind-the-scenes content, polls, or announcements. |
How to Post a Reel on Instagram From Your Phone?
Reels are a popular way to share video content on Instagram. They are designed for vertical, engaging videos and can help you showcase your personality, educate your audience, promote a product, or share a quick story.
If you’re learning how to post on IG, creating a Reel is slightly different from uploading a regular photo or video. You can record a new video directly in Instagram or use clips already saved on your phone.
How to Upload a Reel on Instagram
Follow these simple steps to create and share your Reel:
1. Open Instagram and tap the + button.
Open the Instagram app and tap the + (Create) button. Select Reel from the available content options.
2. Record or upload your video.
You can record a new video using Instagram’s camera or select one or more existing video clips from your phone. Choose clips that fit your topic and work well together.
3. Edit your Reel.
Trim unwanted parts, adjust the order of your clips, and make sure the video flows smoothly. You can also add music or audio, text, stickers, effects, and other available editing elements.
4. Choose a cover.
Select a frame from your video or choose another image as your cover, depending on the options available. Pick something clear and relevant because the cover helps people understand what your Reel is about when they see it on your profile.
5. Add your caption and details.
Write a short caption that gives viewers context or encourages them to take action. You can also add relevant tags, hashtags, or other available post details.
6. Review and share.
Watch your reel one more time to check the video, audio, caption, and cover. When everything looks good, tap Share to publish it.
| How to Create Reels That Get Attention? Simply knowing how to post Instagram photos or videos isn’t enough when you’re creating short-form content. Reels need to capture attention quickly and give viewers a reason to keep watching. Keep these tips in mind: ▪ Start with a strong opening: Show the most interesting part of your video early instead of taking too long to get to the point. ▪ Keep your topic clear: Viewers should quickly understand what your Reel is about. ▪ Use vertical video: This format is designed to fit naturally on a phone screen. ▪ Add text when helpful: On-screen text can make your message easier to follow, especially when viewers watch without sound. ▪ Use relevant audio: Choose music or sounds that fit your content and audience. ▪ Keep the pacing natural: Remove unnecessary pauses or sections that don’t add value. ▪ Choose a clear cover: Make it easy for someone visiting your profile to understand what the Reel is about. |
How to Post on Instagram Using a Computer Or Desktop
You don’t have to use your phone every time you want to publish content. Instagram also allows you to upload content from a computer through a web browser, making it convenient to post when your photos, videos, or other content are already saved on your PC or Mac.
You can use the desktop experience to publish different types of content, including photos, videos, carousels, and Reels, depending on the features currently available to your account.
Two Official Ways to Post on Instagram From a Desktop
If you’re wondering how do you post on Instagram from a computer, you have several options depending on how you manage your content and how often you publish
1. Instagram on the Web:
You can use Instagram directly through your web browser to upload content from your computer. This is a convenient option for publishing individual photos, videos, carousels, and other supported content without using the mobile app.
2. Meta Business Suite:
Meta Business Suite provides businesses and creators with tools to manage their Facebook and Instagram content from one place. Depending on the features available to your account, you can use it to create, publish, and schedule content while managing your social media activity from a desktop.
How to Upload a Post or Video on Instagram From Your Computer or Desktop?
Post Using Instagram on the Web
If you’re looking for how to upload in Instagram using a computer, follow these simple steps:
1. Open Instagram in your web browser.
Go to Instagram’s website and sign in to your account.
2. Click the Create (+) button.
Look for the + (Create) option in the Instagram interface and select it to start a new post.
3. Choose your photo or video.
Select the content you want to upload from your computer. If you’re posting multiple photos or videos, choose the items you want to include in your carousel.
4. Adjust your content.
Depending on the content you’re uploading, you may be able to crop your image, change the format, or make other available adjustments. Review the preview to ensure your content is framed correctly.
5. Add your caption and other details.
Write a caption that matches your content and audience. You can also add relevant tags, a location, and other available post details.
6. Review and click Share.
Check your post one final time to make sure everything looks correct. When you’re ready, click Share to publish it.
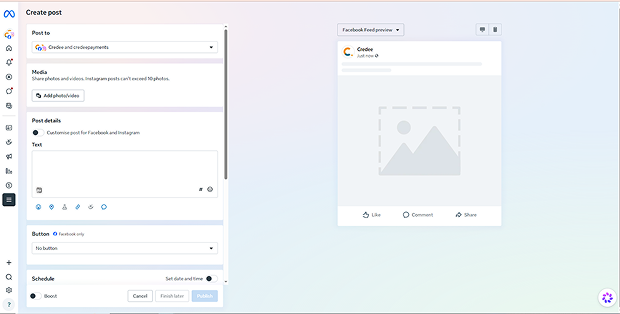
Post Using Meta Business Suite
Meta Business Suite is designed for businesses and creators who want to manage their Facebook and Instagram activity from one place. It can also be useful when you want to plan and schedule content in advance.
Step 1: Open Meta Business Suite
Go to Meta Business Suite and sign in with the account linked to your business pages and Instagram.
Step 2: Select Your Instagram Account
Choose the Instagram account you want to manage and make sure you’re working with the correct profile.
Step 3: Start Creating a Post
Look for the option to create new content and select Instagram as the platform where you want to publish.
Step 4: Upload Your Photo or Video
Choose the content you want to share from your computer.
Step 5: Add Your Caption and Details
Write your caption and add any relevant tags, hashtags, or other available details.
Step 6: Choose When to Publish.
Depending on the available features, you can publish your post immediately or schedule it for a later date and time.
Step 7: Review and Publish or Schedule
Check your content and posting details. Then choose the option to publish immediately or schedule your post.
Best for: Businesses and creators who manage Instagram and Facebook content and want to plan or schedule posts from one place.
How to Post Instagram Stories Using a Desktop?
If you’re looking for how to post on Instagram Stories from a PC or Mac, you have a couple of options.
You can use your browser’s developer tools to access a mobile-style Instagram interface or use Meta Business Suite if your Instagram account is connected to an eligible professional account.
Method 1: Use Your Browser’s Mobile View to Upload a Story
This method allows you to open Instagram on your computer and switch the browser to a mobile-style view.
Step 1: Open Instagram and Log In
Open Instagram in a browser such as Chrome or another supported browser. Sign in to the account where you want to share your story.
Step 2: Open Your Browser’s Developer Tools
Right-click anywhere on the Instagram page and select Inspect. (or press Ctrl + Shift + I on Windows / ⌥ ⌘ I on Mac).
Step 3: Switch to Mobile or Tablet View
In the developer tools panel, look for the icon that lets you switch between desktop and mobile device views. Select the mobile or tablet view and refresh the Instagram page.
Step 4: Upload Your Story
After the page reloads, Instagram should display a mobile-style interface. Look for the option to create a story and select the photo or video you want to upload from your computer.
Step 5: Review and Share
Check your story and make any available changes. Once you’re satisfied, use the available option to share it.
Note: Instagram’s website and browser interface can change over time, so this method may not always work the same way. If the story upload option doesn’t appear, try another browser or use Meta Business Suite instead.
Method 2: Use Meta Business Suite
If you manage a professional Instagram account, Meta Business Suite can provide a more convenient way to manage your content from a computer. It can also be useful if you want to plan and schedule content rather than publish everything immediately.
Step 1: Open Meta Business Suite
Visit Meta Business Suite on your computer and log in with the account connected to your Instagram profile.
Step 2: Connect or Select Your Instagram Account
Make sure the correct Instagram account is connected and selected before creating your Story.
Step 3: Create Your Story
Go to the content creation or planner section and choose the option to create an Instagram Story.
Step 4: Upload Your Content
Select the photo or video you want to use from your computer. Add any available text or other elements to prepare your story.
Step 5: Preview Your Story
Review how your content looks before publishing. Check that the image or video is properly framed and that any text is easy to read.
Step 6: Publish or Schedule
Depending on the features available to your account, you can publish the story immediately or schedule it for a later time.
How to Post on Instagram from Desktop and Mobile with Practina?
If you manage Instagram content for a business, creating and publishing posts manually can take time. Practina helps simplify the process by giving you tools to create content, plan your posts, and manage your social media activity from one place.
Whether you’re working from a computer or managing content while you’re away from your desk, you can use Practina to organize your Instagram publishing workflow.
Posting From a Desktop With Practina
The desktop experience is useful when you’re planning multiple posts, working with files saved on your computer, or building your content calendar.
Step 1: Log In to Your Practina Account
Open Practina in your web browser and sign in to your account. Once you’re inside the dashboard, you can access your available content and social media tools.
Step 2: Connect Your Instagram Account
Make sure your Instagram Business or Creator account is connected to Practina. This allows you to manage your Instagram content through the platform.
Step 3: Create or Upload Your Content
You can create content using Practina’s available AI-powered tools or upload your own photos and videos.
If you’re using the AI content creation option, provide information about your business, industry, website, or the type of content you want to create. Practina can then help generate content based on your input.
You can also use your own photos or videos if you already have content prepared.
Step 4: Review and Customize Your Post
Review the generated or uploaded content before publishing. You can make changes to your caption, add relevant hashtags, and check that your visual content is properly formatted for Instagram.
Step 5: Publish or Schedule Your Post
Once your post is ready, you can choose to publish it immediately or schedule it for a future date and time through your content planner.
Scheduling can be particularly useful for businesses that want to maintain a consistent Instagram presence without creating and publishing every post manually.
Posting From Mobile With Practina
A mobile workflow can be helpful when you want to review your content or manage your social media activity while you’re away from your computer.
Step 1: Open the Practina Mobile App
Install and open the Practina app on your mobile device, then sign in to your account.
Step 2: Review Your Planned Content
Check your content calendar to see the posts you’ve created or planned. This gives you an overview of your upcoming social media activity.
Step 3: Create or Adjust Content
Depending on the available features, you can create new content, provide a prompt for your post, or make changes to existing content from your mobile device.
Step 4: Review and Publish
Preview your content to make sure the post looks right. Once you’re satisfied, you can add it to your publishing schedule or publish it, depending on the available options.
Conclusion
Knowing how to post on Instagram is only the starting point. The real value comes from understanding what to share, who you’re creating it for, and why it deserves your audience’s attention.
Whether you’re learning how to post on IG, figuring out how to post Instagram photos, or simply asking how do you post on Instagram, the process becomes much easier once you understand the basics. Choose the right format for your message, create clear and relevant content, optimize the details, and give your audience a reason to engage.
For businesses, a strong Instagram presence requires more than publishing whenever you have something ready. It means planning content around specific goals, maintaining a consistent brand voice, using relevant captions and hashtags, and reviewing performance to understand what resonates with your audience.
FAQs
Q: What is the best time to post on Instagram for likes?
A: The best time to post on Instagram for likes is when your audience is most active. Check Instagram Insights to find when your followers are online, then test different posting times to identify your highest-engagement periods.
Q: What is the new format for Instagram posts in 2026?
A: The main Instagram post formats in 2026 are single photos, carousel posts, videos, Reels, and Stories. For feed posts, portrait images can use a 4:5 aspect ratio, while Reels and Stories typically use a 9:16 vertical format.
Q: How do I post pictures on Instagram in full size?
A: To post a picture in full size, select the photo when creating a post and use Instagram’s expand/crop option to adjust the image. For minimal cropping, prepare your photo in a supported aspect ratio before uploading.
Q: How do I post on Instagram in 2026 on iPhone?
A: To post on Instagram from an iPhone, open the Instagram app, tap +, select Post, choose your photo or video, add a caption and other details, then tap Share.
Q: How do I post pictures on Instagram in full size?
A: Select your photo, tap the expand icon in the preview screen to fit the image within Instagram’s supported frame, then continue editing and tap Share to publish it.
Q: How do I post on Instagram for the first time?
A: To post on Instagram for the first time, open the app, tap +, choose Post, select a photo or video, add a caption, review your content, and tap Share.